❯ cat ~/blog/nuc-home-dev-server.md
Turning a NUC into a Home Dev Server for Projects and AI Agents
Omarchy (or Omaterm), herdr, Docker Compose, Caddy, Tailscale and Cloudflare Tunnel
I wanted one small box at home that does three things:
- Runs my coding agents around the clock, so they keep working when my laptop is closed and I can check on them from anywhere, including my phone.
- Hosts every project's Docker Compose stack at a proper internal URL with a real HTTPS certificate, such as
https://podium.nuc.example.dev, reachable only from my own devices. - Publishes a few selected services on the public internet, such as a client demo, without opening a single port on my router.
An Intel NUC (or any mini PC) is ideal for this: quiet, low power, always on. This article covers the whole setup, from OS install to the first project online.
The architecture in one picture
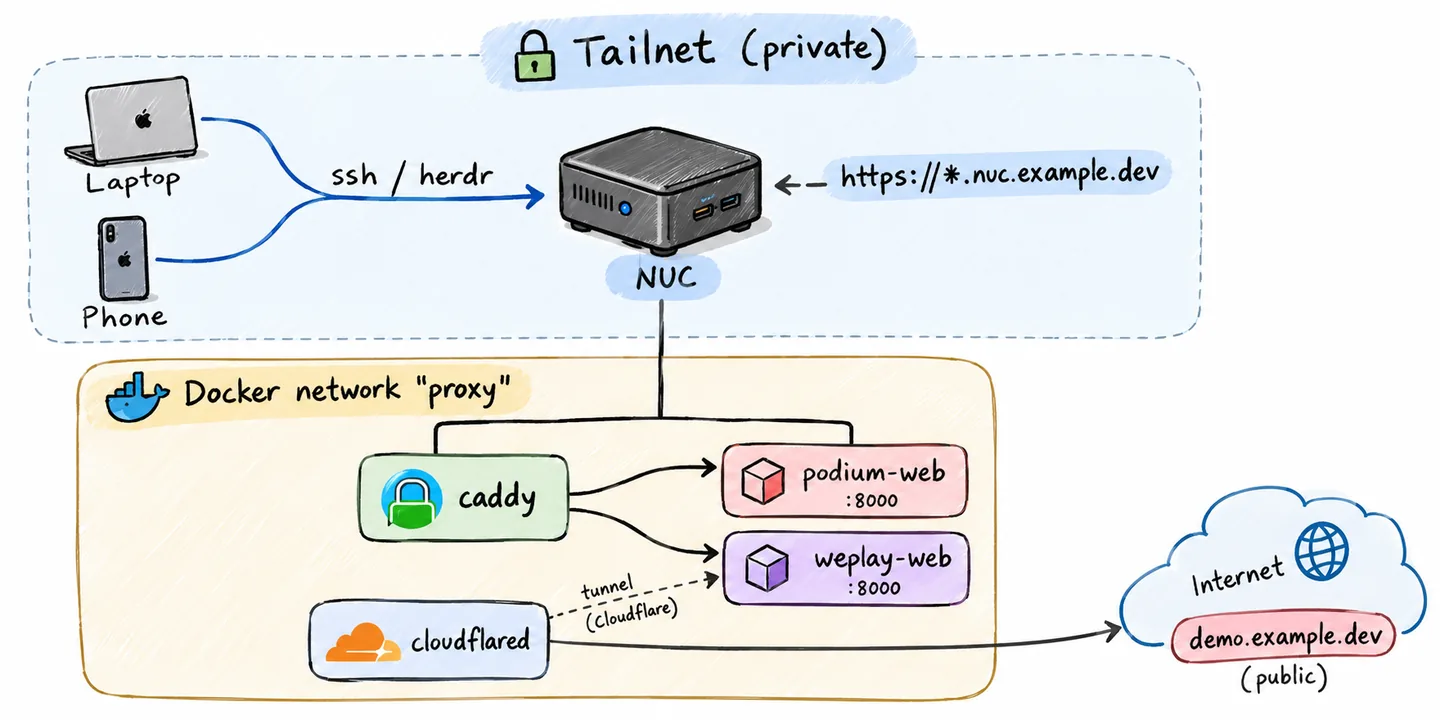
- Tailscale puts the NUC on a private network with all my devices. SSH, herdr and internal web apps travel over it.
- Caddy is the only container that publishes ports on the host. It routes each internal hostname to the right container and gets Let's Encrypt certificates through the Cloudflare DNS-01 challenge, so nothing needs to be reachable from the internet.
- Cloudflare Tunnel (
cloudflared) makes an outbound connection to Cloudflare and exposes only the public hostnames I explicitly configure. - herdr keeps the agents' terminals alive on the NUC, and I attach to it from wherever I am.
Step 0: Omarchy or Omaterm?
Omarchy is an opinionated Arch Linux + Hyprland desktop. It is a great choice if the NUC will sometimes have a screen and keyboard plugged in.
If the box will run headless, look at Omaterm, its sibling made for servers, agent environments and dev boxes. You install plain Arch with archinstall, then run its installer, which sets up the usual developer tooling and offers to log in to GitHub and Tailscale during setup.
Everything below works on either one, since both are Arch.
Two Omarchy defaults to keep in mind:
- OpenSSH is installed but the service is disabled.
- The firewall (ufw) opens nothing except LocalSend.
We'll use Tailscale SSH and allow the Tailscale interface through the firewall, so both points are handled.
BIOS tip: set the NUC to power on after AC loss. A server that stays off after a power cut isn't much of a server.
Step 1: Bootstrap the host
This script installs Docker and Tailscale, keeps the machine awake, joins the tailnet and installs herdr. It is safe to run more than once.
#!/usr/bin/env bash
set -euo pipefail

# Packages
sudo pacman -Syu --needed --noconfirm docker docker-compose docker-buildx tailscale git github-cli

# Services
sudo systemctl enable --now docker tailscaled
sudo usermod -aG docker "$USER"

# Never sleep: it's a server now
sudo systemctl mask sleep.target suspend.target hibernate.target hybrid-sleep.target

# Let background processes (herdr server, user units) live without an open login session
sudo loginctl enable-linger "$USER"

# Firewall: trust the tailnet interface
if command -v ufw >/dev/null 2>&1; then
  sudo ufw allow in on tailscale0
  sudo ufw reload
fi

# Join the tailnet with Tailscale SSH enabled (prints a login URL the first time).
# If already connected (Omaterm's installer does it), `tailscale up` would refuse
# unless every current flag is repeated: `tailscale set` changes only these two.
if tailscale status >/dev/null 2>&1; then
  sudo tailscale set --ssh --hostname=nuc
else
  sudo tailscale up --ssh --hostname=nuc
fi

# Shared Docker network for the reverse proxy
sudo docker network inspect proxy >/dev/null 2>&1 || sudo docker network create proxy

# herdr
command -v herdr >/dev/null 2>&1 || curl -fsSL https://herdr.dev/install.sh | sh

echo "Tailscale IP:"; tailscale ip -4
Then, in the Tailscale admin console:
- Disable key expiry for the NUC, so it doesn't drop off the tailnet after a few months.
- Check your SSH policy. The default rule for your own devices may use
checkmode, which asks you to re-authenticate in a browser regularly. That breaks background reconnects from herdr. For your own machines,acceptis the practical choice.
Log out and back in so the docker group applies, run gh auth login, and install your agents (Claude Code, Codex, opencode…).
Step 2: Internal domains with real HTTPS
Tailscale's MagicDNS gives the machine a name like nuc.your-tailnet.ts.net, but no subdomains per project. To get podium.nuc.example.dev, weplay.nuc.example.dev and so on, I use a domain I own on Cloudflare.
DNS
In Cloudflare DNS, add one record:
| Type | Name | Content | Proxy |
|---|---|---|---|
| A | *.nuc |
the NUC's 100.x.y.z IP |
DNS only (grey) |
Every something.nuc.example.dev now resolves to the NUC's Tailscale IP. Devices on your tailnet can reach it; everyone else gets an unreachable address.
Then create a Cloudflare API token with the permission Zone → DNS → Edit, scoped to that one zone. Caddy uses it to write the temporary TXT records for the DNS-01 challenge.
The edge stack
All of this lives in ~/nuc-edge.
Dockerfile: Caddy built with two plugins. caddy-docker-proxy reads its configuration from container labels; caddy-dns/cloudflare handles DNS-01.
FROM caddy:2-builder AS builder
RUN xcaddy build \
    --with github.com/lucaslorentz/caddy-docker-proxy/v2 \
    --with github.com/caddy-dns/cloudflare

FROM caddy:2-alpine
COPY --from=builder /usr/bin/caddy /usr/bin/caddy
CMD ["caddy", "docker-proxy"]
Caddyfile: global options only. Everything else comes from labels.
{
    email {env.ACME_EMAIL}
    acme_dns cloudflare {env.CF_API_TOKEN}
}
compose.yml:
name: edge

services:
  caddy:
    build: .
    restart: unless-stopped
    ports:
      - "80:80"
      - "443:443"
      - "443:443/udp"
    environment:
      CADDY_INGRESS_NETWORKS: proxy
      CADDY_DOCKER_CADDYFILE_PATH: /etc/caddy/Caddyfile
      CF_API_TOKEN: ${CF_API_TOKEN}
      ACME_EMAIL: ${ACME_EMAIL}
    volumes:
      - /var/run/docker.sock:/var/run/docker.sock:ro
      - ./Caddyfile:/etc/caddy/Caddyfile:ro
      - caddy_data:/data
      - caddy_config:/config
    networks: [proxy]

  # Smoke test
  whoami:
    image: traefik/whoami
    restart: unless-stopped
    networks: [proxy]
    labels:
      caddy: whoami.${INTERNAL_DOMAIN}
      caddy.reverse_proxy: "{{upstreams 80}}"

  cloudflared:
    image: cloudflare/cloudflared:latest
    restart: unless-stopped
    command: tunnel --no-autoupdate run
    environment:
      TUNNEL_TOKEN: ${CF_TUNNEL_TOKEN}
    networks: [proxy]

networks:
  proxy:
    external: true

volumes:
  caddy_data:
  caddy_config:
.env:
INTERNAL_DOMAIN=nuc.example.dev
CF_API_TOKEN=...
[email protected]
CF_TUNNEL_TOKEN=...
Start it with docker compose up -d --build, then open https://whoami.nuc.example.dev from a device on your tailnet. A valid certificate and a whoami page mean DNS, certificates and routing all work.
Step 3: Plugging in a project
This is where the setup pays off. Adding a project takes three changes to its Compose file:
- No
ports:. Nothing publishes ports on the host except Caddy. - Join the external
proxynetwork (the database stays on the project's private network). - Declare the hostname in labels.
Here's a Django example:
name: weplay

services:
  web:
    build: .
    command: python manage.py runserver 0.0.0.0:8000
    env_file: .env
    depends_on: [db, redis]
    networks:
      default:
      proxy:
        aliases: [weplay-web]          # stable name for cloudflared routes
    labels:
      caddy: weplay.nuc.example.dev
      caddy.reverse_proxy: "{{upstreams 8000}}"

  db:
    image: postgres:17
    environment:
      POSTGRES_PASSWORD: postgres
    volumes: [pgdata:/var/lib/postgresql/data]

  redis:
    image: redis:7-alpine

networks:
  proxy:
    external: true

volumes:
  pgdata:
Run docker compose up -d and, a few seconds later, Caddy has picked up the labels, obtained a certificate and started routing. Run docker compose down and the route disappears. No proxy config file to edit, no port numbers to juggle, no collisions between projects that all want port 8000.
Django needs to know it sits behind a TLS-terminating proxy:
ALLOWED_HOSTS = ["weplay.nuc.example.dev", "demo.example.dev"]
CSRF_TRUSTED_ORIGINS = ["https://weplay.nuc.example.dev", "https://demo.example.dev"]
SECURE_PROXY_SSL_HEADER = ("HTTP_X_FORWARDED_PROTO", "https")
Step 4: Public access with Cloudflare Tunnel
Some things need to be public: a demo for a client, a webhook endpoint, a staging site to share.
- In the Cloudflare Zero Trust dashboard, go to Networks → Tunnels and click Create a tunnel. Choose Cloudflared and give it a name, such as
nuc. -
On the "Install and run a connector" screen, pick Docker. Cloudflare shows a command like this one:
docker run cloudflare/cloudflared:latest tunnel --no-autoupdate run --token eyJhIjoi...Don't run it: the edge stack already runs
cloudflared. Copy only the longeyJ...string after--tokeninto.env:CF_TUNNEL_TOKEN=eyJhIjoi...If you lose it, the tunnel's settings show the same screen and token again.
-
Restart the edge stack so
cloudflaredconnects. The tunnel shows as Healthy in the dashboard. - Add a public hostname to the tunnel, for example
demo.example.dev→http://weplay-web:8000.
Because cloudflared is on the same proxy network, it reaches containers by their network alias. That's why the template sets aliases: [weplay-web]: it stays stable whatever Compose names the container.
Anything that isn't meant to be fully public should sit behind a Cloudflare Access policy (email one-time PIN is the easiest). This way only the people you choose can reach the demo, and you never open a port on your router.
Keep internal and public names apart. Internal hosts live under *.nuc.example.dev; public ones use different names that the tunnel manages.
Step 5: Agents with herdr
herdr is a terminal multiplexer built for coding agents. It works like tmux (workspaces, tabs, panes, detach and reattach) but it also detects which panes run agents and shows whether each one is working, blocked waiting for input, idle or done. One glance at the sidebar tells you which agent needs you.
It uses a client/server model: the server owns the terminals and keeps running when no one is attached. That's what makes it a good fit for an always-on box.
On the NUC
herdr integration install claude   # and codex, opencode… as needed
herdr                              # start a session, create workspaces per project
With the official integration installed, herdr can resume Claude Code conversations after a server restart. When the server stops (after a reboot, for example), herdr restores the layout: workspaces, tabs, panes and their directories. Running processes don't survive a restart, but agents with a supported integration are resumed in their previous session.
Detach with ctrl+b q. Everything keeps running.
From the laptop
Add an entry to ~/.ssh/config if you like (with Tailscale SSH, ssh nuc already works through MagicDNS), then:
herdr machine add nuc
herdr
The NUC now appears in the herdr sidebar next to your local machine, with its workspaces and agents. You switch between machines without opening another client, and if the connection drops the agents keep running on the NUC. herdr reconnects on its own.
For a one-off session, herdr --remote nuc also works.
From the phone
Install the Tailscale app and an SSH client (Termius is the easy pick on iOS and Android), connect to nuc and run herdr. You get the same agents, the same state, and you can answer the one that's blocked waiting for a permission.
A typical loop
- Open a herdr workspace for a project on the NUC.
- Start an agent in one pane and
docker compose upin another. - The agent changes code and the dev server reloads; check the result at
https://podium.nuc.example.devfrom your laptop or phone. - Close the laptop. The agent keeps going. Come back later from wherever you are.
Caveats worth knowing
- Docker bypasses ufw. Ports published by Docker (here, only Caddy's 80/443) are reachable from your LAN even if ufw says otherwise. On a home network that's usually fine. To restrict them to the tailnet, bind them to the Tailscale IP, such as
"100.x.y.z:443:443", and make sure Tailscale is up before Docker starts. - Certificate Transparency logs are public. Every certificate Caddy obtains, and therefore every internal hostname, appears in CT logs. The names are visible, but they resolve to a Tailscale IP nobody else can reach. If even the names are sensitive, use a single wildcard certificate instead of one certificate per host.
- Secrets.
.envholds a DNS-edit token and a tunnel token. Keep it out of git, and scope the Cloudflare token to a single zone. - Agents with Docker access are powerful. An agent that can run
dockeron the host effectively has root on it. Keep this box for development, not for anything sensitive.
Wrapping up
The result is a quiet box under the desk that:
- runs my agents around the clock, reachable from my laptop and my phone through herdr;
- gives every project a clean HTTPS URL on my private network, by adding two labels to its Compose file;
- publishes exactly the services I choose, behind Cloudflare Access, with no open ports.
Adding a project takes two labels and a network. Adding an agent means opening a pane. The rest of the setup doesn't need to change.
Further reading
- Omaterm manual
- Omarchy
- herdr documentation: see Connecting machines and Session state and restore
- caddy-docker-proxy
- caddy-dns/cloudflare
- Tailscale SSH
- Cloudflare Tunnel